![]()
07 Milestone Project 1: 🍔👁 Food Vision Big™
In the previous notebook (transfer learning part 3: scaling up) we built Food Vision mini: a transfer learning model which beat the original results of the Food101 paper with only 10% of the data.
But you might be wondering, what would happen if we used all the data?
Well, that's what we're going to find out in this notebook!
We're going to be building Food Vision Big™, using all of the data from the Food101 dataset.
Yep. All 75,750 training images and 25,250 testing images.
And guess what...
This time we've got the goal of beating DeepFood, a 2016 paper which used a Convolutional Neural Network trained for 2-3 days to achieve 77.4% top-1 accuracy.
🔑 Note: Top-1 accuracy means "accuracy for the top softmax activation value output by the model" (because softmax ouputs a value for every class, but top-1 means only the highest one is evaluated). Top-5 accuracy means "accuracy for the top 5 softmax activation values output by the model", in other words, did the true label appear in the top 5 activation values? Top-5 accuracy scores are usually noticeably higher than top-1.
| 🍔👁 Food Vision Big™ | 🍔👁 Food Vision mini | |
|---|---|---|
| Dataset source | TensorFlow Datasets | Preprocessed download from Kaggle |
| Train data | 75,750 images | 7,575 images |
| Test data | 25,250 images | 25,250 images |
| Mixed precision | Yes | No |
| Data loading | Performanant tf.data API | TensorFlow pre-built function |
| Target results | 77.4% top-1 accuracy (beat DeepFood paper) | 50.76% top-1 accuracy (beat Food101 paper) |
Table comparing difference between Food Vision Big (this notebook) versus Food Vision mini (previous notebook).
Alongside attempting to beat the DeepFood paper, we're going to learn about two methods to significantly improve the speed of our model training:
- Prefetching
- Mixed precision training
But more on these later.
What we're going to cover
- Using TensorFlow Datasets to download and explore data
- Creating preprocessing function for our data
- Batching & preparing datasets for modelling (making our datasets run fast)
- Creating modelling callbacks
- Setting up mixed precision training
- Building a feature extraction model (see transfer learning part 1: feature extraction)
- Fine-tuning the feature extraction model (see transfer learning part 2: fine-tuning)
- Viewing training results on TensorBoard
How you should approach this notebook
You can read through the descriptions and the code (it should all run, except for the cells which error on purpose), but there's a better option.
Write all of the code yourself.
Yes. I'm serious. Create a new notebook, and rewrite each line by yourself. Investigate it, see if you can break it, why does it break?
You don't have to write the text descriptions but writing the code yourself is a great way to get hands-on experience.
Don't worry if you make mistakes, we all do. The way to get better and make less mistakes is to write more code.
📖 Resources:
- See the full set of course materials on GitHub: https://github.com/mrdbourke/tensorflow-deep-learning
- See updates to this notebook on GitHub: https://github.com/mrdbourke/tensorflow-deep-learning/discussions/550
Check GPU
For this notebook, we're going to be doing something different.
We're going to be using mixed precision training.
Mixed precision training was introduced in TensorFlow 2.4.0 (a very new feature at the time of writing).
What does mixed precision training do?
Mixed precision training uses a combination of single precision (float32) and half-preicison (float16) data types to speed up model training (up 3x on modern GPUs).
We'll talk about this more later on but in the meantime you can read the TensorFlow documentation on mixed precision for more details.
For now, before we can move forward if we want to use mixed precision training, we need to make sure the GPU powering our Google Colab instance (if you're using Google Colab) is compataible.
For mixed precision training to work, you need access to a GPU with a compute compability score of 7.0+.
Google Colab offers several kinds of GPU.
However, some of them aren't compatiable with mixed precision training.
Therefore to make sure you have access to mixed precision training in Google Colab, you can check your GPU compute capability score on Nvidia's developer website.
As of May 2023, the GPUs available on Google Colab which allow mixed precision training are:
- NVIDIA A100 (available with Google Colab Pro)
- NVIDIA Tesla T4
🔑 Note: You can run the cell below to check your GPU name and then compare it to list of GPUs on NVIDIA's developer page to see if it's capable of using mixed precision training.
# Get GPU name
!nvidia-smi -L
GPU 0: NVIDIA A100-SXM4-40GB (UUID: GPU-269f6413-0643-12da-9e68-ef2cb8b4aad3)
Since mixed precision training was introduced in TensorFlow 2.4.0, make sure you've got at least TensorFlow 2.4.0+.
# Note: As of May 2023, there have been some issues with TensorFlow versions 2.9-2.12
# with the following code.
# However, these seemed to have been fixed in version 2.13+.
# TensorFlow version 2.13 is available in tf-nightly as of May 2023 (will be default in Google Colab soon).
# Therefore, to prevent errors we'll install tf-nightly first.
# See more here: https://github.com/mrdbourke/tensorflow-deep-learning/discussions/550

# Install tf-nightly (required until 2.13.0+ is the default in Google Colab)
!pip install -U -q tf-nightly

# Check TensorFlow version (should be minimum 2.4.0+ but 2.13.0+ is better)
import tensorflow as tf
print(f"TensorFlow version: {tf.__version__}")

# Add timestamp
import datetime
print(f"Notebook last run (end-to-end): {datetime.datetime.now()}")
TensorFlow version: 2.14.0-dev20230518
Notebook last run (end-to-end): 2023-05-19 02:54:07.955201
Get helper functions
We've created a series of helper functions throughout the previous notebooks in the course. Instead of rewriting them (tedious), we'll import the helper_functions.py file from the GitHub repo.
# Get helper functions file
import os

if not os.path.exists("helper_functions.py"):
    !wget https://raw.githubusercontent.com/mrdbourke/tensorflow-deep-learning/main/extras/helper_functions.py
else:
    print("[INFO] 'helper_functions.py' already exists, skipping download.")
--2023-05-19 02:13:56--  https://raw.githubusercontent.com/mrdbourke/tensorflow-deep-learning/main/extras/helper_functions.py
Resolving raw.githubusercontent.com (raw.githubusercontent.com)... 185.199.110.133, 185.199.108.133, 185.199.109.133, ...
Connecting to raw.githubusercontent.com (raw.githubusercontent.com)|185.199.110.133|:443... connected.
HTTP request sent, awaiting response... 200 OK
Length: 10246 (10K) [text/plain]
Saving to: ‘helper_functions.py’

helper_functions.py 100%[===================>]  10.01K  --.-KB/s    in 0s

2023-05-19 02:13:56 (100 MB/s) - ‘helper_functions.py’ saved [10246/10246]
# Import series of helper functions for the notebook (we've created/used these in previous notebooks)
from helper_functions import create_tensorboard_callback, plot_loss_curves, compare_historys
Use TensorFlow Datasets to Download Data
In previous notebooks, we've downloaded our food images (from the Food101 dataset) from Google Storage.
And this is a typical workflow you'd use if you're working on your own datasets.
However, there's another way to get datasets ready to use with TensorFlow.
For many of the most popular datasets in the machine learning world (often referred to and used as benchmarks), you can access them through TensorFlow Datasets (TFDS).
What is TensorFlow Datasets?
A place for prepared and ready-to-use machine learning datasets.
Why use TensorFlow Datasets?
- Load data already in Tensors
- Practice on well established datasets
- Experiment with differet data loading techniques (like we're going to use in this notebook)
- Experiment with new TensorFlow features quickly (such as mixed precision training)
Why not use TensorFlow Datasets?
- The datasets are static (they don't change, like your real-world datasets would)
- Might not be suited for your particular problem (but great for experimenting)
To begin using TensorFlow Datasets we can import it under the alias tfds.
# Get TensorFlow Datasets
import tensorflow_datasets as tfds
To find all of the available datasets in TensorFlow Datasets, you can use the list_builders() method.
After doing so, we can check to see if the one we're after ("food101") is present.
# Get all available datasets in TFDS
datasets_list = tfds.list_builders()

# Set our target dataset and see if it exists
target_dataset = "food101"
print(f"'{target_dataset}' in TensorFlow Datasets: {target_dataset in datasets_list}")
'food101' in TensorFlow Datasets: True
Beautiful! It looks like the dataset we're after is available (note there are plenty more available but we're on Food101).
To get access to the Food101 dataset from the TFDS, we can use the tfds.load() method.
In particular, we'll have to pass it a few parameters to let it know what we're after:
name(str) : the target dataset (e.g."food101")split(list, optional) : what splits of the dataset we're after (e.g.["train", "validation"])- the
splitparameter is quite tricky. See the documentation for more.
- the
shuffle_files(bool) : whether or not to shuffle the files on download, defaults toFalseas_supervised(bool) :Trueto download data samples in tuple format ((data, label)) orFalsefor dictionary formatwith_info(bool) :Trueto download dataset metadata (labels, number of samples, etc)
🔑 Note: Calling the
tfds.load()method will start to download a target dataset to disk if thedownload=Trueparameter is set (default). This dataset could be 100GB+, so make sure you have space.
# Load in the data (takes about 5-6 minutes in Google Colab)
(train_data, test_data), ds_info = tfds.load(name="food101", # target dataset to get from TFDS
                                             split=["train", "validation"], # what splits of data should we get? note: not all datasets have train, valid, test
                                             shuffle_files=True, # shuffle files on download?
                                             as_supervised=True, # download data in tuple format (sample, label), e.g. (image, label)
                                             with_info=True) # include dataset metadata? if so, tfds.load() returns tuple (data, ds_info)
Wonderful! After a few minutes of downloading, we've now got access to entire Food101 dataset (in tensor format) ready for modelling.
Now let's get a little information from our dataset, starting with the class names.
Getting class names from a TensorFlow Datasets dataset requires downloading the "dataset_info" variable (by using the as_supervised=True parameter in the tfds.load() method, note: this will only work for supervised datasets in TFDS).
We can access the class names of a particular dataset using the dataset_info.features attribute and accessing names attribute of the the "label" key.
# Features of Food101 TFDS
ds_info.features
FeaturesDict({
    'image': Image(shape=(None, None, 3), dtype=uint8),
    'label': ClassLabel(shape=(), dtype=int64, num_classes=101),
})
# Get class names
class_names = ds_info.features["label"].names
class_names[:10]
['apple_pie',
 'baby_back_ribs',
 'baklava',
 'beef_carpaccio',
 'beef_tartare',
 'beet_salad',
 'beignets',
 'bibimbap',
 'bread_pudding',
 'breakfast_burrito']
Exploring the Food101 data from TensorFlow Datasets
Now we've downloaded the Food101 dataset from TensorFlow Datasets, how about we do what any good data explorer should?
In other words, "visualize, visualize, visualize".
Let's find out a few details about our dataset:
- The shape of our input data (image tensors)
- The datatype of our input data
- What the labels of our input data look like (e.g. one-hot encoded versus label-encoded)
- Do the labels match up with the class names?
To do, let's take one sample off the training data (using the .take() method) and explore it.
# Take one sample off the training data
train_one_sample = train_data.take(1) # samples are in format (image_tensor, label)
Because we used the as_supervised=True parameter in our tfds.load() method above, data samples come in the tuple format structure (data, label) or in our case (image_tensor, label).
# What does one sample of our training data look like?
train_one_sample
<_TakeDataset element_spec=(TensorSpec(shape=(None, None, 3), dtype=tf.uint8, name=None), TensorSpec(shape=(), dtype=tf.int64, name=None))>
Let's loop through our single training sample and get some info from the image_tensor and label.
# Output info about our training sample
for image, label in train_one_sample:
  print(f"""
  Image shape: {image.shape}
  Image dtype: {image.dtype}
  Target class from Food101 (tensor form): {label}
  Class name (str form): {class_names[label.numpy()]}
        """)
  Image shape: (512, 512, 3)
  Image dtype: <dtype: 'uint8'>
  Target class from Food101 (tensor form): 90
  Class name (str form): spaghetti_bolognese
Because we set the shuffle_files=True parameter in our tfds.load() method above, running the cell above a few times will give a different result each time.
Checking these you might notice some of the images have different shapes, for example (512, 342, 3) and (512, 512, 3) (height, width, color_channels).
Let's see what one of the image tensors from TFDS's Food101 dataset looks like.
# What does an image tensor from TFDS's Food101 look like?
image
<tf.Tensor: shape=(512, 512, 3), dtype=uint8, numpy=
array([[[ 12,  13,   7],
        [ 12,  13,   7],
        [ 13,  14,   8],
        ...,
        [ 21,  11,   0],
        [ 21,  11,   0],
        [ 21,  11,   0]],

       [[ 12,  13,   7],
        [ 11,  12,   6],
        [ 11,  12,   6],
        ...,
        [ 21,  11,   0],
        [ 21,  11,   0],
        [ 21,  11,   0]],

       [[  7,   8,   2],
        [  7,   8,   2],
        [  7,   8,   2],
        ...,
        [ 22,  12,   2],
        [ 21,  11,   1],
        [ 20,  10,   0]],

       ...,

       [[188, 191, 184],
        [188, 191, 184],
        [188, 191, 184],
        ...,
        [243, 248, 244],
        [243, 248, 244],
        [242, 247, 243]],

       [[187, 190, 183],
        [189, 192, 185],
        [190, 193, 186],
        ...,
        [241, 245, 244],
        [241, 245, 244],
        [241, 245, 244]],

       [[186, 189, 182],
        [189, 192, 185],
        [191, 194, 187],
        ...,
        [238, 242, 241],
        [239, 243, 242],
        [239, 243, 242]]], dtype=uint8)>
# What are the min and max values?
tf.reduce_min(image), tf.reduce_max(image)
(<tf.Tensor: shape=(), dtype=uint8, numpy=0>,
 <tf.Tensor: shape=(), dtype=uint8, numpy=255>)
Alright looks like our image tensors have values of between 0 & 255 (standard red, green, blue colour values) and the values are of data type unit8.
We might have to preprocess these before passing them to a neural network. But we'll handle this later.
In the meantime, let's see if we can plot an image sample.
Plot an image from TensorFlow Datasets
We've seen our image tensors in tensor format, now let's really adhere to our motto.
"Visualize, visualize, visualize!"
Let's plot one of the image samples using matplotlib.pyplot.imshow() and set the title to target class name.
# Plot an image tensor
import matplotlib.pyplot as plt
plt.imshow(image)
plt.title(class_names[label.numpy()]) # add title to image by indexing on class_names list
plt.axis(False);

Delicious!
Okay, looks like the Food101 data we've got from TFDS is similar to the datasets we've been using in previous notebooks.
Now let's preprocess it and get it ready for use with a neural network.
Create preprocessing functions for our data
In previous notebooks, when our images were in folder format we used the method tf.keras.utils.image_dataset_from_directory() to load them in.
Doing this meant our data was loaded into a format ready to be used with our models.
However, since we've downloaded the data from TensorFlow Datasets, there are a couple of preprocessing steps we have to take before it's ready to model.
More specifically, our data is currently:
- In
uint8data type - Comprised of all differnet sized tensors (different sized images)
- Not scaled (the pixel values are between 0 & 255)
Whereas, models like data to be:
- In
float32data type - Have all of the same size tensors (batches require all tensors have the same shape, e.g.
(224, 224, 3)) - Scaled (values between 0 & 1), also called normalized
To take care of these, we'll create a preprocess_img() function which:
- Resizes an input image tensor to a specified size using
tf.image.resize() - Converts an input image tensor's current datatype to
tf.float32usingtf.cast()
🔑 Note: Pretrained EfficientNetBX models in
tf.keras.applications.efficientnet(what we're going to be using) have rescaling built-in. But for many other model architectures you'll want to rescale your data (e.g. get its values between 0 & 1). This could be incorporated inside your "preprocess_img()" function (like the one below) or within your model as atf.keras.layers.Rescalinglayer.
# Make a function for preprocessing images
def preprocess_img(image, label, img_shape=224):
    """
    Converts image datatype from 'uint8' -> 'float32' and reshapes image to
    [img_shape, img_shape, color_channels]
    """
    image = tf.image.resize(image, [img_shape, img_shape]) # reshape to img_shape
    return tf.cast(image, tf.float32), label # return (float32_image, label) tuple
Our preprocess_img() function above takes image and label as input (even though it does nothing to the label) because our dataset is currently in the tuple structure (image, label).
Let's try our function out on a target image.
# Preprocess a single sample image and check the outputs
preprocessed_img = preprocess_img(image, label)[0]
print(f"Image before preprocessing:\n {image[:2]}...,\nShape: {image.shape},\nDatatype: {image.dtype}\n")
print(f"Image after preprocessing:\n {preprocessed_img[:2]}...,\nShape: {preprocessed_img.shape},\nDatatype: {preprocessed_img.dtype}")
Image before preprocessing:
 [[[12 13  7]
  [12 13  7]
  [13 14  8]
  ...
  [21 11  0]
  [21 11  0]
  [21 11  0]]

 [[12 13  7]
  [11 12  6]
  [11 12  6]
  ...
  [21 11  0]
  [21 11  0]
  [21 11  0]]]...,
Shape: (512, 512, 3),
Datatype: <dtype: 'uint8'>

Image after preprocessing:
 [[[11.586735   12.586735    6.586735  ]
  [11.714286   12.714286    6.714286  ]
  [ 8.857142    9.857142    4.8571424 ]
  ...
  [20.714308   11.142836    1.2857144 ]
  [20.668371   10.668372    0.        ]
  [21.         11.          0.        ]]

 [[ 2.3571415   3.3571415   0.1428566 ]
  [ 3.1530607   4.153061    0.07653028]
  [ 3.0561223   4.0561223   0.        ]
  ...
  [26.071407   18.071407    7.0714073 ]
  [24.785702   14.785702    4.7857018 ]
  [22.499966   12.499966    2.4999657 ]]]...,
Shape: (224, 224, 3),
Datatype: <dtype: 'float32'>
Excellent! Looks like our preprocess_img() function is working as expected.
The input image gets converted from uint8 to float32 and gets reshaped from its current shape to (224, 224, 3).
How does it look?
# We can still plot our preprocessed image as long as we
# divide by 255 (for matplotlib capatibility)
plt.imshow(preprocessed_img/255.)
plt.title(class_names[label])
plt.axis(False);

All this food visualization is making me hungry. How about we start preparing to model it?
Batch & prepare datasets
Before we can model our data, we have to turn it into batches.
Why?
Because computing on batches is memory efficient.
We turn our data from 101,000 image tensors and labels (train and test combined) into batches of 32 image and label pairs, thus enabling it to fit into the memory of our GPU.
To do this in effective way, we're going to be leveraging a number of methods from the tf.data API.
📖 Resource: For loading data in the most performant way possible, see the TensorFlow docuemntation on Better performance with the tf.data API.
Specifically, we're going to be using:
map()- maps a predefined function to a target dataset (e.g.preprocess_img()to our image tensors)shuffle()- randomly shuffles the elements of a target dataset upbuffer_size(ideally, thebuffer_sizeis equal to the size of the dataset, however, this may have implications on memory)batch()- turns elements of a target dataset into batches (size defined by parameterbatch_size)prefetch()- prepares subsequent batches of data whilst other batches of data are being computed on (improves data loading speed but costs memory)- Extra:
cache()- caches (saves them for later) elements in a target dataset, saving loading time (will only work if your dataset is small enough to fit in memory, standard Colab instances only have 12GB of memory)
Things to note:
- Can't batch tensors of different shapes (e.g. different image sizes, need to reshape images first, hence our
preprocess_img()function) shuffle()keeps a buffer of the number you pass it images shuffled, ideally this number would be all of the samples in your training set, however, if your training set is large, this buffer might not fit in memory (a fairly large number like 1000 or 10000 is usually suffice for shuffling)- For methods with the
num_parallel_callsparameter available (such asmap()), setting it tonum_parallel_calls=tf.data.AUTOTUNEwill parallelize preprocessing and significantly improve speed - Can't use
cache()unless your dataset can fit in memory
Woah, the above is alot. But once we've coded below, it'll start to make sense.
We're going to through things in the following order:
Original dataset (e.g. train_data) -> map() -> shuffle() -> batch() -> prefetch() -> PrefetchDataset
This is like saying,
"Hey, map this preprocessing function across our training dataset, then shuffle a number of elements before batching them together and make sure you prepare new batches (prefetch) whilst the model is looking through the current batch".
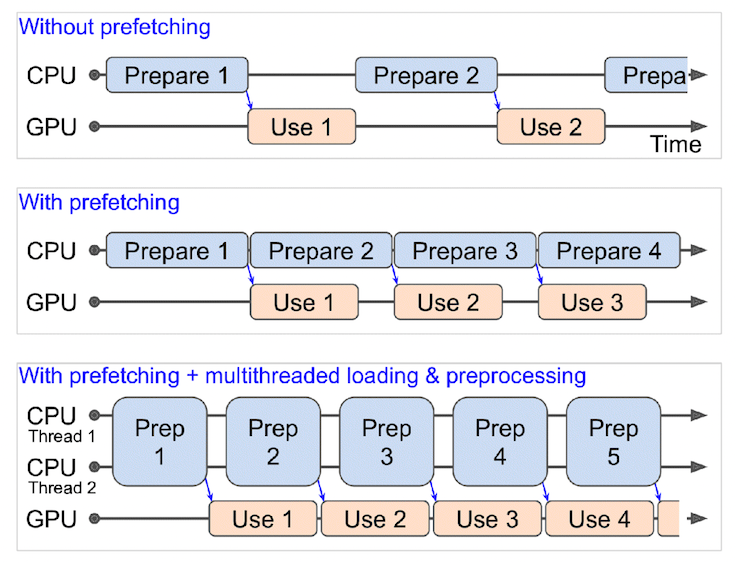
What happens when you use prefetching (faster) versus what happens when you don't use prefetching (slower). Source: Page 422 of Hands-On Machine Learning with Scikit-Learn, Keras & TensorFlow Book by Aurélien Géron.
# Map preprocessing function to training data (and paralellize)
train_data = train_data.map(map_func=preprocess_img, num_parallel_calls=tf.data.AUTOTUNE)
# Shuffle train_data and turn it into batches and prefetch it (load it faster)
train_data = train_data.shuffle(buffer_size=1000).batch(batch_size=32).prefetch(buffer_size=tf.data.AUTOTUNE)

# Map prepreprocessing function to test data
test_data = test_data.map(preprocess_img, num_parallel_calls=tf.data.AUTOTUNE)
# Turn test data into batches (don't need to shuffle)
test_data = test_data.batch(32).prefetch(tf.data.AUTOTUNE)
And now let's check out what our prepared datasets look like.
train_data, test_data
(<_PrefetchDataset element_spec=(TensorSpec(shape=(None, 224, 224, 3), dtype=tf.float32, name=None), TensorSpec(shape=(None,), dtype=tf.int64, name=None))>,
 <_PrefetchDataset element_spec=(TensorSpec(shape=(None, 224, 224, 3), dtype=tf.float32, name=None), TensorSpec(shape=(None,), dtype=tf.int64, name=None))>)
Excellent! Looks like our data is now in tutples of (image, label) with datatypes of (tf.float32, tf.int64), just what our model is after.
🔑 Note: You can get away without calling the
prefetch()method on the end of your datasets, however, you'd probably see significantly slower data loading speeds when building a model. So most of your dataset input pipelines should end with a call toprefecth().
Onward.
Create modelling callbacks
Since we're going to be training on a large amount of data and training could take a long time, it's a good idea to set up some modelling callbacks so we be sure of things like our model's training logs being tracked and our model being checkpointed (saved) after various training milestones.
To do each of these we'll use the following callbacks:
tf.keras.callbacks.TensorBoard()- allows us to keep track of our model's training history so we can inspect it later (note: we've created this callback before have imported it fromhelper_functions.pyascreate_tensorboard_callback())tf.keras.callbacks.ModelCheckpoint()- saves our model's progress at various intervals so we can load it and resuse it later without having to retrain it- Checkpointing is also helpful so we can start fine-tuning our model at a particular epoch and revert back to a previous state if fine-tuning offers no benefits
# Create TensorBoard callback (already have "create_tensorboard_callback()" from a previous notebook)
from helper_functions import create_tensorboard_callback

# Create ModelCheckpoint callback to save model's progress
checkpoint_path = "model_checkpoints/cp.ckpt" # saving weights requires ".ckpt" extension
model_checkpoint = tf.keras.callbacks.ModelCheckpoint(checkpoint_path,
                                                      monitor="val_accuracy", # save the model weights with best validation accuracy
                                                      save_best_only=True, # only save the best weights
                                                      save_weights_only=True, # only save model weights (not whole model)
                                                      verbose=0) # don't print out whether or not model is being saved
Setup mixed precision training
We touched on mixed precision training above.
However, we didn't quite explain it.
Normally, tensors in TensorFlow default to the float32 datatype (unless otherwise specified).
In computer science, float32 is also known as single-precision floating-point format. The 32 means it usually occupies 32 bits in computer memory.
Your GPU has a limited memory, therefore it can only handle a number of float32 tensors at the same time.
This is where mixed precision training comes in.
Mixed precision training involves using a mix of float16 and float32 tensors to make better use of your GPU's memory.
Can you guess what float16 means?
Well, if you thought since float32 meant single-precision floating-point, you might've guessed float16 means half-precision floating-point format. And if you did, you're right! And if not, no trouble, now you know.
For tensors in float16 format, each element occupies 16 bits in computer memory.
So, where does this leave us?
As mentioned before, when using mixed precision training, your model will make use of float32 and float16 data types to use less memory where possible and in turn run faster (using less memory per tensor means more tensors can be computed on simultaneously).
As a result, using mixed precision training can improve your performance on modern GPUs (those with a compute capability score of 7.0+) by up to 3x.
For a more detailed explanation, I encourage you to read through the TensorFlow mixed precision guide (I'd highly recommend at least checking out the summary).
 Because mixed precision training uses a combination of float32 and float16 data types, you may see up to a 3x speedup on modern GPUs.
🔑 Note: If your GPU doesn't have a score of over 7.0+ (e.g. P100 in Google Colab), mixed precision won't work (see: "Supported Hardware" in the mixed precision guide for more).
📖 Resource: If you'd like to learn more about precision in computer science (the detail to which a numerical quantity is expressed by a computer), see the Wikipedia page) (and accompanying resources).
Okay, enough talk, let's see how we can turn on mixed precision training in TensorFlow.
The beautiful thing is, the tensorflow.keras.mixed_precision API has made it very easy for us to get started.
First, we'll import the API and then use the set_global_policy() method to set the dtype policy to "mixed_float16".
# Turn on mixed precision training
from tensorflow.keras import mixed_precision
mixed_precision.set_global_policy(policy="mixed_float16") # set global policy to mixed precision
Nice! As long as the GPU you're using has a compute capability of 7.0+ the cell above should run without error.
Now we can check the global dtype policy (the policy which will be used by layers in our model) using the mixed_precision.global_policy() method.
mixed_precision.global_policy() # should output "mixed_float16" (if your GPU is compatible with mixed precision)
<Policy "mixed_float16">
Great, since the global dtype policy is now "mixed_float16" our model will automatically take advantage of float16 variables where possible and in turn speed up training.
Build feature extraction model
Callbacks: ready to roll.
Mixed precision: turned on.
Let's build a model.
Because our dataset is quite large, we're going to move towards fine-tuning an existing pretrained model (EfficienetNetB0).
But before we get into fine-tuning, let's set up a feature-extraction model.
Recall, the typical order for using transfer learning is:
- Build a feature extraction model (replace the top few layers of a pretrained model)
- Train for a few epochs with lower layers frozen
- Fine-tune if necessary with multiple layers unfrozen
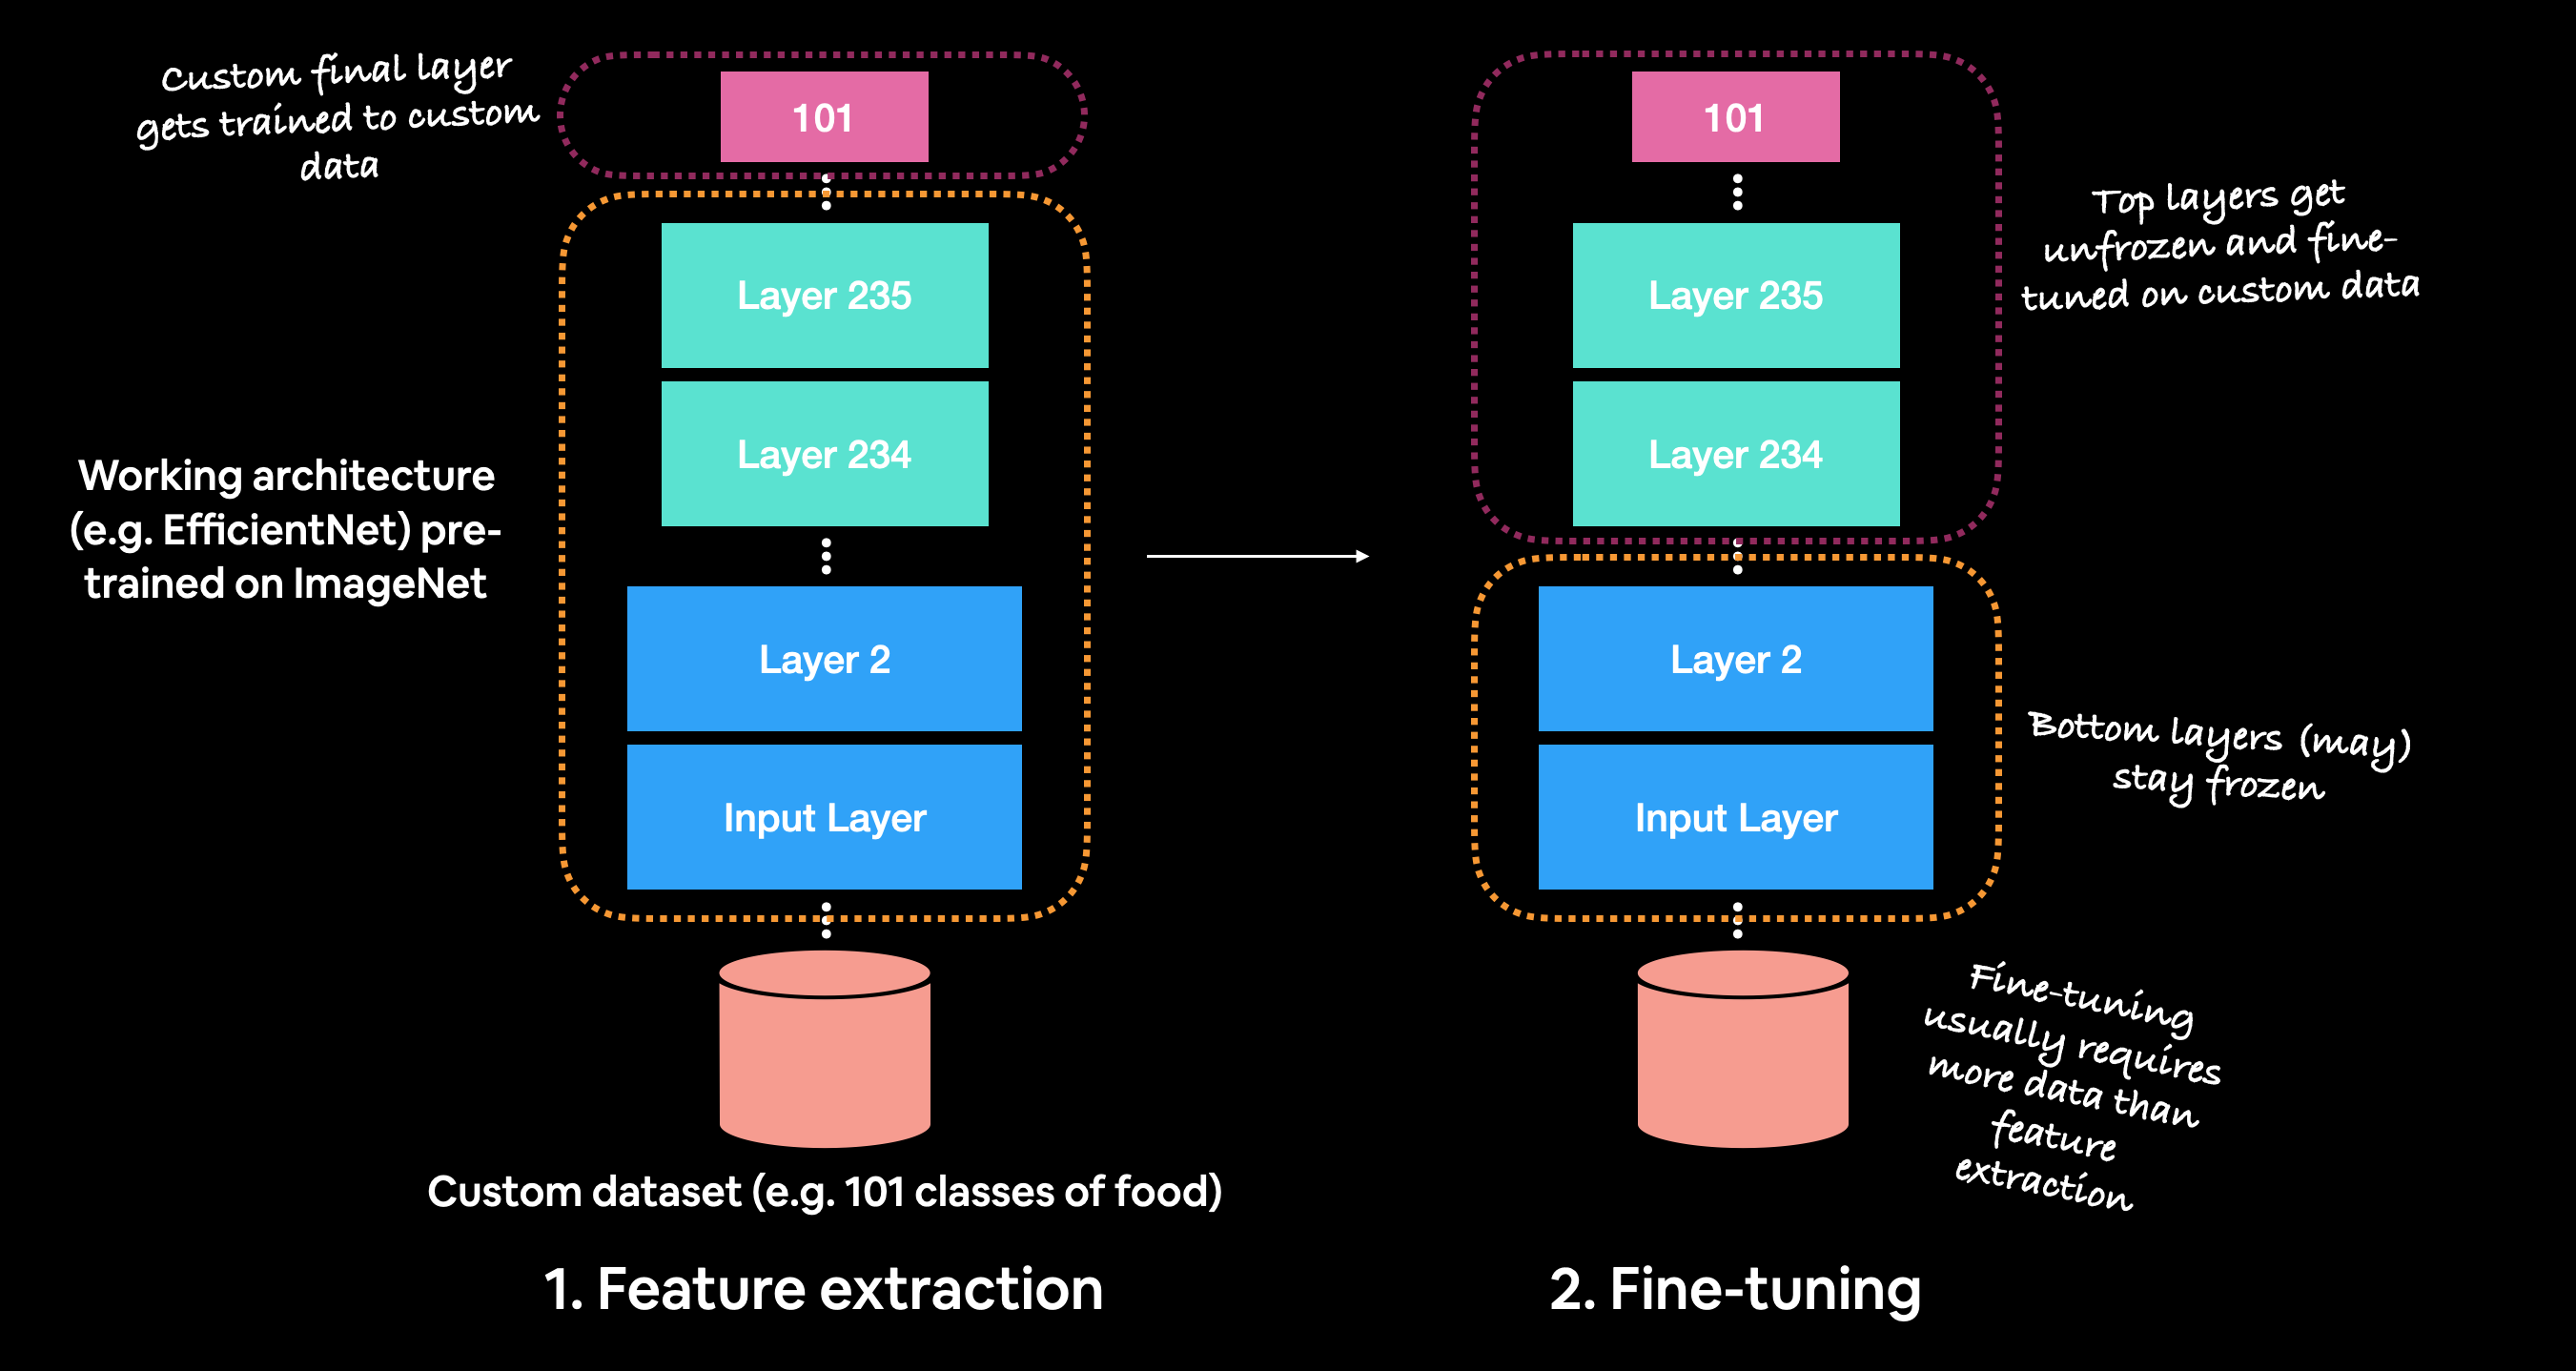 Before fine-tuning, it's best practice to train a feature extraction model with custom top layers.
To build the feature extraction model (covered in Transfer Learning in TensorFlow Part 1: Feature extraction), we'll:
- Use
EfficientNetB0fromtf.keras.applicationspre-trained on ImageNet as our base model- We'll download this without the top layers using
include_top=Falseparameter so we can create our own output layers
- We'll download this without the top layers using
- Freeze the base model layers so we can use the pre-learned patterns the base model has found on ImageNet
- Put together the input, base model, pooling and output layers in a Functional model
- Compile the Functional model using the Adam optimizer and sparse categorical crossentropy as the loss function (since our labels aren't one-hot encoded)
- Fit the model for 3 epochs using the TensorBoard and ModelCheckpoint callbacks
🔑 Note: Since we're using mixed precision training, our model needs a separate output layer with a hard-coded
dtype=float32, for example,layers.Activation("softmax", dtype=tf.float32). This ensures the outputs of our model are returned back to the float32 data type which is more numerically stable than the float16 datatype (important for loss calculations). See the "Building the model" section in the TensorFlow mixed precision guide for more.
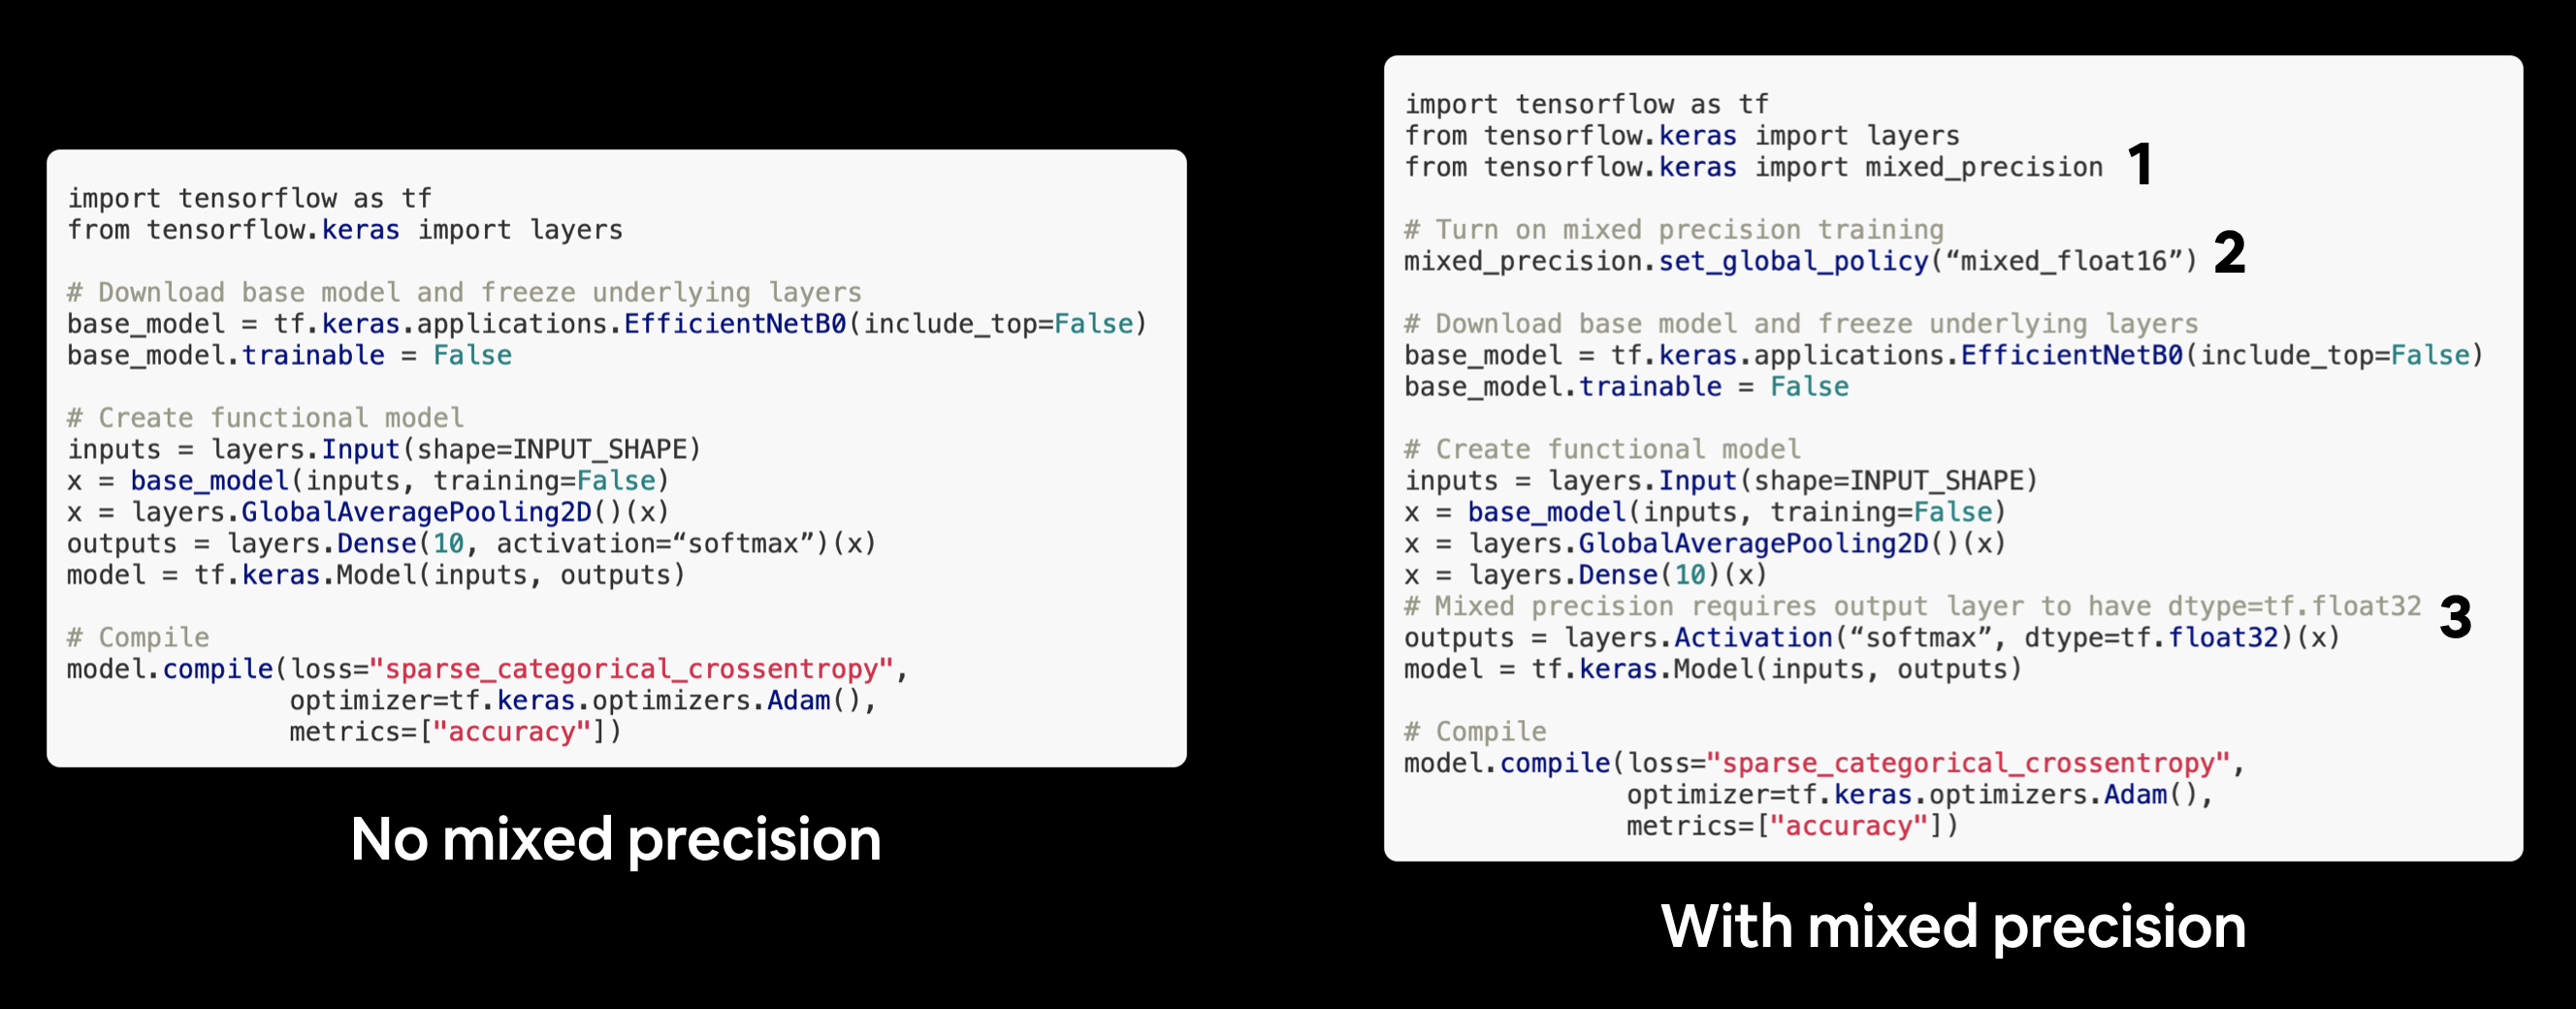 Turning mixed precision on in TensorFlow with 3 lines of code.
from tensorflow.keras import layers

# Create base model
input_shape = (224, 224, 3)
base_model = tf.keras.applications.EfficientNetB0(include_top=False)
base_model.trainable = False # freeze base model layers

# Create Functional model
inputs = layers.Input(shape=input_shape, name="input_layer")
# Note: EfficientNetBX models have rescaling built-in but if your model didn't you could have a layer like below
# x = layers.Rescaling(1./255)(x)
x = base_model(inputs, training=False) # set base_model to inference mode only
x = layers.GlobalAveragePooling2D(name="pooling_layer")(x)
x = layers.Dense(len(class_names))(x) # want one output neuron per class
# Separate activation of output layer so we can output float32 activations
outputs = layers.Activation("softmax", dtype=tf.float32, name="softmax_float32")(x)
model = tf.keras.Model(inputs, outputs)

# Compile the model
model.compile(loss="sparse_categorical_crossentropy", # Use sparse_categorical_crossentropy when labels are *not* one-hot
              optimizer=tf.keras.optimizers.Adam(),
              metrics=["accuracy"])
Downloading data from https://storage.googleapis.com/keras-applications/efficientnetb0_notop.h5
16705208/16705208 [==============================] - 2s 0us/step
# Check out our model
model.summary()
Model: "model"
_________________________________________________________________
 Layer (type)                Output Shape              Param #
=================================================================
 input_layer (InputLayer)    [(None, 224, 224, 3)]     0

 efficientnetb0 (Functional  (None, None, None, 1280   4049571
 )                           )

 pooling_layer (GlobalAvera  (None, 1280)              0
 gePooling2D)

 dense (Dense)               (None, 101)               129381

 softmax_float32 (Activatio  (None, 101)               0
 n)

=================================================================
Total params: 4178952 (15.94 MB)
Trainable params: 129381 (505.39 KB)
Non-trainable params: 4049571 (15.45 MB)
_________________________________________________________________
Checking layer dtype policies (are we using mixed precision?)
Model ready to go!
Before we said the mixed precision API will automatically change our layers' dtype policy's to whatever the global dtype policy is (in our case it's "mixed_float16").
We can check this by iterating through our model's layers and printing layer attributes such as dtype and dtype_policy.
# Check the dtype_policy attributes of layers in our model
for layer in model.layers:
    print(layer.name, layer.trainable, layer.dtype, layer.dtype_policy) # Check the dtype policy of layers
input_layer True float32 <Policy "float32">
efficientnetb0 False float32 <Policy "mixed_float16">
pooling_layer True float32 <Policy "mixed_float16">
dense True float32 <Policy "mixed_float16">
softmax_float32 True float32 <Policy "float32">
Going through the above we see:
layer.name(str) : a layer's human-readable name, can be defined by thenameparameter on constructionlayer.trainable(bool) : whether or not a layer is trainable (all of our layers are trainable except the efficientnetb0 layer since we set it'strainableattribute toFalselayer.dtype: the data type a layer stores its variables inlayer.dtype_policy: the data type a layer computes in
🔑 Note: A layer can have a dtype of
float32and a dtype policy of"mixed_float16"because it stores its variables (weights & biases) infloat32(more numerically stable), however it computes infloat16(faster).
We can also check the same details for our model's base model.
# Check the layers in the base model and see what dtype policy they're using
for layer in model.layers[1].layers[:20]: # only check the first 20 layers to save output space
    print(layer.name, layer.trainable, layer.dtype, layer.dtype_policy)
input_1 False float32 <Policy "float32">
rescaling False float32 <Policy "mixed_float16">
normalization False float32 <Policy "mixed_float16">
rescaling_1 False float32 <Policy "mixed_float16">
stem_conv_pad False float32 <Policy "mixed_float16">
stem_conv False float32 <Policy "mixed_float16">
stem_bn False float32 <Policy "mixed_float16">
stem_activation False float32 <Policy "mixed_float16">
block1a_dwconv False float32 <Policy "mixed_float16">
block1a_bn False float32 <Policy "mixed_float16">
block1a_activation False float32 <Policy "mixed_float16">
block1a_se_squeeze False float32 <Policy "mixed_float16">
block1a_se_reshape False float32 <Policy "mixed_float16">
block1a_se_reduce False float32 <Policy "mixed_float16">
block1a_se_expand False float32 <Policy "mixed_float16">
block1a_se_excite False float32 <Policy "mixed_float16">
block1a_project_conv False float32 <Policy "mixed_float16">
block1a_project_bn False float32 <Policy "mixed_float16">
block2a_expand_conv False float32 <Policy "mixed_float16">
block2a_expand_bn False float32 <Policy "mixed_float16">
🔑 Note: The mixed precision API automatically causes layers which can benefit from using the
"mixed_float16"dtype policy to use it. It also prevents layers which shouldn't use it from using it (e.g. the normalization layer at the start of the base model).
Fit the feature extraction model
Now that's one good looking model. Let's fit it to our data shall we?
Three epochs should be enough for our top layers to adjust their weights enough to our food image data.
To save time per epoch, we'll also only validate on 15% of the test data.
# Turn off all warnings except for errors
tf.get_logger().setLevel('ERROR')

# Fit the model with callbacks
history_101_food_classes_feature_extract = model.fit(train_data,
                                                     epochs=3,
                                                     steps_per_epoch=len(train_data),
                                                     validation_data=test_data,
                                                     validation_steps=int(0.15 * len(test_data)),
                                                     callbacks=[create_tensorboard_callback("training_logs",
                                                                                            "efficientnetb0_101_classes_all_data_feature_extract"),
                                                                model_checkpoint])
Saving TensorBoard log files to: training_logs/efficientnetb0_101_classes_all_data_feature_extract/20230519-022415
Epoch 1/3
2368/2368 [==============================] - 67s 22ms/step - loss: 1.7186 - accuracy: 0.5808 - val_loss: 1.1152 - val_accuracy: 0.7018
Epoch 2/3
2368/2368 [==============================] - 51s 21ms/step - loss: 1.1989 - accuracy: 0.6896 - val_loss: 1.0340 - val_accuracy: 0.7135
Epoch 3/3
2368/2368 [==============================] - 51s 21ms/step - loss: 1.0530 - accuracy: 0.7241 - val_loss: 0.9952 - val_accuracy: 0.7240
Nice, looks like our feature extraction model is performing pretty well. How about we evaluate it on the whole test dataset?
# Evaluate model (unsaved version) on whole test dataset
results_feature_extract_model = model.evaluate(test_data)
results_feature_extract_model
790/790 [==============================] - 11s 14ms/step - loss: 0.9993 - accuracy: 0.7279
[0.9992507100105286, 0.7279207706451416]
And since we used the ModelCheckpoint callback, we've got a saved version of our model in the model_checkpoints directory.
Let's load it in and make sure it performs just as well.
Load and evaluate checkpoint weights
We can load in and evaluate our model's checkpoints by:
- Recreating a new instance of our model called
created_modelby turning our original model creation code into a function calledcreate_model(). - Compiling our
created_modelwith the same loss, optimizer and metrics as the original model (every time you create a new model, you must compile it). - Calling the
load_weights()method on ourcreated_modeland passing it the path to where our checkpointed weights are stored. - Calling
evaluate()oncreated_modelwith loaded weights and saving the results. - Comparing the
created_modelresults to our previousmodelresults (these should be the exact same, if not very close).
A reminder, checkpoints are helpful for when you perform an experiment such as fine-tuning your model. In the case you fine-tune your feature extraction model and find it doesn't offer any improvements, you can always revert back to the checkpointed version of your model.
Note: This section originally used the
tf.keras.clone_modelmethod, however, due to several potential errors with that method, it changed to create a new model (rather than cloning) via acreate_model()function. See the discussion on the course GitHub for more.
# 1. Create a function to recreate the original model
def create_model():
  # Create base model
  input_shape = (224, 224, 3)
  base_model = tf.keras.applications.efficientnet.EfficientNetB0(include_top=False)
  base_model.trainable = False # freeze base model layers

  # Create Functional model
  inputs = layers.Input(shape=input_shape, name="input_layer")
  # Note: EfficientNetBX models have rescaling built-in but if your model didn't you could have a layer like below
  # x = layers.Rescaling(1./255)(x)
  x = base_model(inputs, training=False) # set base_model to inference mode only
  x = layers.GlobalAveragePooling2D(name="pooling_layer")(x)
  x = layers.Dense(len(class_names))(x) # want one output neuron per class
  # Separate activation of output layer so we can output float32 activations
  outputs = layers.Activation("softmax", dtype=tf.float32, name="softmax_float32")(x)
  model = tf.keras.Model(inputs, outputs)

  return model

# 2. Create and compile a new version of the original model (new weights)
created_model = create_model()
created_model.compile(loss="sparse_categorical_crossentropy",
                      optimizer=tf.keras.optimizers.Adam(),
                      metrics=["accuracy"])

# 3. Load the saved weights
created_model.load_weights(checkpoint_path)

# 4. Evaluate the model with loaded weights
results_created_model_with_loaded_weights = created_model.evaluate(test_data)
790/790 [==============================] - 15s 15ms/step - loss: 0.9993 - accuracy: 0.7279
Our created_model with loaded weight's results should be very close to the feature extraction model's results (if the cell below errors, something went wrong).
# 5. Loaded checkpoint weights should return very similar results to checkpoint weights prior to saving
import numpy as np
assert np.isclose(results_feature_extract_model, results_created_model_with_loaded_weights).all(), "Loaded weights results are not close to original model."  # check if all elements in array are close
Cloning the model preserves dtype_policy's of layers (but doesn't preserve weights) so if we wanted to continue fine-tuning our created_model, we could and it would still use the mixed precision dtype policy.
# Check the layers in the base model and see what dtype policy they're using
for layer in created_model.layers[1].layers[:20]: # check only the first 20 layers to save printing space
    print(layer.name, layer.trainable, layer.dtype, layer.dtype_policy)
input_2 False float32 <Policy "float32">
rescaling_2 False float32 <Policy "mixed_float16">
normalization_1 False float32 <Policy "mixed_float16">
rescaling_3 False float32 <Policy "mixed_float16">
stem_conv_pad False float32 <Policy "mixed_float16">
stem_conv False float32 <Policy "mixed_float16">
stem_bn False float32 <Policy "mixed_float16">
stem_activation False float32 <Policy "mixed_float16">
block1a_dwconv False float32 <Policy "mixed_float16">
block1a_bn False float32 <Policy "mixed_float16">
block1a_activation False float32 <Policy "mixed_float16">
block1a_se_squeeze False float32 <Policy "mixed_float16">
block1a_se_reshape False float32 <Policy "mixed_float16">
block1a_se_reduce False float32 <Policy "mixed_float16">
block1a_se_expand False float32 <Policy "mixed_float16">
block1a_se_excite False float32 <Policy "mixed_float16">
block1a_project_conv False float32 <Policy "mixed_float16">
block1a_project_bn False float32 <Policy "mixed_float16">
block2a_expand_conv False float32 <Policy "mixed_float16">
block2a_expand_bn False float32 <Policy "mixed_float16">
Save the whole model to file
We can also save the whole model using the save() method.
Since our model is quite large, you might want to save it to Google Drive (if you're using Google Colab) so you can load it in for use later.
🔑 Note: Saving to Google Drive requires mounting Google Drive (go to Files -> Mount Drive).
# ## Saving model to Google Drive (optional)

# # Create save path to drive
# save_dir = "drive/MyDrive/tensorflow_course/food_vision/07_efficientnetb0_feature_extract_model_mixed_precision/"
# # os.makedirs(save_dir) # Make directory if it doesn't exist

# # Save model
# model.save(save_dir)
We can also save it directly to our Google Colab instance.
🔑 Note: Google Colab storage is ephemeral and your model will delete itself (along with any other saved files) when the Colab session expires.
# Save model locally (if you're using Google Colab, your saved model will Colab instance terminates)
save_dir = "07_efficientnetb0_feature_extract_model_mixed_precision"
model.save(save_dir)
And again, we can check whether or not our model saved correctly by loading it in and evaluating it.
# Load model previously saved above
loaded_saved_model = tf.keras.models.load_model(save_dir)
Loading a SavedModel also retains all of the underlying layers dtype_policy (we want them to be "mixed_float16").
# Check the layers in the base model and see what dtype policy they're using
for layer in loaded_saved_model.layers[1].layers[:20]: # check only the first 20 layers to save output space
    print(layer.name, layer.trainable, layer.dtype, layer.dtype_policy)
input_1 True float32 <Policy "float32">
rescaling False float32 <Policy "mixed_float16">
normalization False float32 <Policy "mixed_float16">
rescaling_1 False float32 <Policy "mixed_float16">
stem_conv_pad False float32 <Policy "mixed_float16">
stem_conv False float32 <Policy "mixed_float16">
stem_bn False float32 <Policy "mixed_float16">
stem_activation False float32 <Policy "mixed_float16">
block1a_dwconv False float32 <Policy "mixed_float16">
block1a_bn False float32 <Policy "mixed_float16">
block1a_activation False float32 <Policy "mixed_float16">
block1a_se_squeeze False float32 <Policy "mixed_float16">
block1a_se_reshape False float32 <Policy "mixed_float16">
block1a_se_reduce False float32 <Policy "mixed_float16">
block1a_se_expand False float32 <Policy "mixed_float16">
block1a_se_excite False float32 <Policy "mixed_float16">
block1a_project_conv False float32 <Policy "mixed_float16">
block1a_project_bn False float32 <Policy "mixed_float16">
block2a_expand_conv False float32 <Policy "mixed_float16">
block2a_expand_bn False float32 <Policy "mixed_float16">
# Check loaded model performance (this should be the same as results_feature_extract_model)
results_loaded_saved_model = loaded_saved_model.evaluate(test_data)
results_loaded_saved_model
790/790 [==============================] - 15s 16ms/step - loss: 0.9993 - accuracy: 0.7279
[0.9992507696151733, 0.7279207706451416]
# The loaded model's results should equal (or at least be very close) to the model's results prior to saving
# Note: this will only work if you've instatiated results variables
import numpy as np
assert np.isclose(results_feature_extract_model, results_loaded_saved_model).all()
That's what we want! Our loaded model performing as it should.
🔑 Note: We spent a fair bit of time making sure our model saved correctly because training on a lot of data can be time-consuming, so we want to make sure we don't have to continaully train from scratch.
Preparing our model's layers for fine-tuning
Our feature-extraction model is showing some great promise after three epochs. But since we've got so much data, it's probably worthwhile that we see what results we can get with fine-tuning (fine-tuning usually works best when you've got quite a large amount of data).
Remember our goal of beating the DeepFood paper?
They were able to achieve 77.4% top-1 accuracy on Food101 over 2-3 days of training.
Do you think fine-tuning will get us there?
Let's find out.
To start, let's load in our saved model.
🔑 Note: It's worth remembering a traditional workflow for fine-tuning is to freeze a pre-trained base model and then train only the output layers for a few iterations so their weights can be updated inline with your custom data (feature extraction). And then unfreeze a number or all of the layers in the base model and continue training until the model stops improving.
Like all good cooking shows, I've saved a model I prepared earlier (the feature extraction model from above) to Google Storage.
We can download it to make sure we're using the same model going forward.
# Download the saved model from Google Storage
!wget https://storage.googleapis.com/ztm_tf_course/food_vision/07_efficientnetb0_feature_extract_model_mixed_precision.zip
--2023-05-19 02:28:24--  https://storage.googleapis.com/ztm_tf_course/food_vision/07_efficientnetb0_feature_extract_model_mixed_precision.zip
Resolving storage.googleapis.com (storage.googleapis.com)... 142.250.4.128, 142.251.10.128, 142.251.12.128, ...
Connecting to storage.googleapis.com (storage.googleapis.com)|142.250.4.128|:443... connected.
HTTP request sent, awaiting response... 200 OK
Length: 16976857 (16M) [application/zip]
Saving to: ‘07_efficientnetb0_feature_extract_model_mixed_precision.zip’

07_efficientnetb0_f 100%[===================>]  16.19M  8.80MB/s    in 1.8s

2023-05-19 02:28:27 (8.80 MB/s) - ‘07_efficientnetb0_feature_extract_model_mixed_precision.zip’ saved [16976857/16976857]
# Unzip the SavedModel downloaded from Google Stroage
!mkdir downloaded_gs_model # create new dir to store downloaded feature extraction model
!unzip 07_efficientnetb0_feature_extract_model_mixed_precision.zip -d downloaded_gs_model
Archive:  07_efficientnetb0_feature_extract_model_mixed_precision.zip
   creating: downloaded_gs_model/07_efficientnetb0_feature_extract_model_mixed_precision/
   creating: downloaded_gs_model/07_efficientnetb0_feature_extract_model_mixed_precision/variables/
  inflating: downloaded_gs_model/07_efficientnetb0_feature_extract_model_mixed_precision/variables/variables.data-00000-of-00001
  inflating: downloaded_gs_model/07_efficientnetb0_feature_extract_model_mixed_precision/variables/variables.index
  inflating: downloaded_gs_model/07_efficientnetb0_feature_extract_model_mixed_precision/saved_model.pb
   creating: downloaded_gs_model/07_efficientnetb0_feature_extract_model_mixed_precision/assets/
# Load and evaluate downloaded GS model
loaded_gs_model = tf.keras.models.load_model("downloaded_gs_model/07_efficientnetb0_feature_extract_model_mixed_precision")
# Get a summary of our downloaded model
loaded_gs_model.summary()
Model: "model"
_________________________________________________________________
 Layer (type)                Output Shape              Param #
=================================================================
 input_layer (InputLayer)    [(None, 224, 224, 3)]     0

 efficientnetb0 (Functional  (None, None, None, 1280   4049571
 )                           )

 pooling_layer (GlobalAvera  (None, 1280)              0
 gePooling2D)

 dense (Dense)               (None, 101)               129381

 softmax_float32 (Activatio  (None, 101)               0
 n)

=================================================================
Total params: 4178952 (15.94 MB)
Trainable params: 129381 (505.39 KB)
Non-trainable params: 4049571 (15.45 MB)
_________________________________________________________________
And now let's make sure our loaded model is performing as expected.
# How does the loaded model perform?
results_loaded_gs_model = loaded_gs_model.evaluate(test_data)
results_loaded_gs_model
790/790 [==============================] - 15s 16ms/step - loss: 1.0881 - accuracy: 0.7067
[1.0880972146987915, 0.7066534757614136]
Great, our loaded model is performing as expected.
When we first created our model, we froze all of the layers in the base model by setting base_model.trainable=False but since we've loaded in our model from file, let's check whether or not the layers are trainable or not.
# Are any of the layers in our model frozen?
for layer in loaded_gs_model.layers:
    layer.trainable = True # set all layers to trainable
    print(layer.name, layer.trainable, layer.dtype, layer.dtype_policy) # make sure loaded model is using mixed precision dtype_policy ("mixed_float16")
input_layer True float32 <Policy "float32">
efficientnetb0 True float32 <Policy "mixed_float16">
pooling_layer True float32 <Policy "mixed_float16">
dense True float32 <Policy "mixed_float16">
softmax_float32 True float32 <Policy "float32">
Alright, it seems like each layer in our loaded model is trainable. But what if we got a little deeper and inspected each of the layers in our base model?
🤔 Question: Which layer in the loaded model is our base model?
Before saving the Functional model to file, we created it with five layers (layers below are 0-indexed): 0. The input layer
- The pre-trained base model layer (
tf.keras.applications.efficientnet.EfficientNetB0) - The pooling layer
- The fully-connected (dense) layer
- The output softmax activation (with float32 dtype)
Therefore to inspect our base model layer, we can access the layers attribute of the layer at index 1 in our model.
# Check the layers in the base model and see what dtype policy they're using
for layer in loaded_gs_model.layers[1].layers[:20]:
    print(layer.name, layer.trainable, layer.dtype, layer.dtype_policy)
input_1 True float32 <Policy "float32">
rescaling True float32 <Policy "mixed_float16">
normalization True float32 <Policy "float32">
stem_conv_pad True float32 <Policy "mixed_float16">
stem_conv True float32 <Policy "mixed_float16">
stem_bn True float32 <Policy "mixed_float16">
stem_activation True float32 <Policy "mixed_float16">
block1a_dwconv True float32 <Policy "mixed_float16">
block1a_bn True float32 <Policy "mixed_float16">
block1a_activation True float32 <Policy "mixed_float16">
block1a_se_squeeze True float32 <Policy "mixed_float16">
block1a_se_reshape True float32 <Policy "mixed_float16">
block1a_se_reduce True float32 <Policy "mixed_float16">
block1a_se_expand True float32 <Policy "mixed_float16">
block1a_se_excite True float32 <Policy "mixed_float16">
block1a_project_conv True float32 <Policy "mixed_float16">
block1a_project_bn True float32 <Policy "mixed_float16">
block2a_expand_conv True float32 <Policy "mixed_float16">
block2a_expand_bn True float32 <Policy "mixed_float16">
block2a_expand_activation True float32 <Policy "mixed_float16">
Wonderful, it looks like each layer in our base model is trainable (unfrozen) and every layer which should be using the dtype policy "mixed_policy16" is using it.
Since we've got so much data (750 images x 101 training classes = 75750 training images), let's keep all of our base model's layers unfrozen.
🔑 Note: If you've got a small amount of data (less than 100 images per class), you may want to only unfreeze and fine-tune a small number of layers in the base model at a time. Otherwise, you risk overfitting.
A couple more callbacks
We're about to start fine-tuning a deep learning model with over 200 layers using over 100,000 (75k+ training, 25K+ testing) images, which means our model's training time is probably going to be much longer than before.
🤔 Question: How long does training take?
It could be a couple of hours or in the case of the DeepFood paper (the baseline we're trying to beat), their best performing model took 2-3 days of training time.
You will really only know how long it'll take once you start training.
🤔 Question: When do you stop training?
Ideally, when your model stops improving. But again, due to the nature of deep learning, it can be hard to know when exactly a model will stop improving.
Luckily, there's a solution: the EarlyStopping callback.
The EarlyStopping callback monitors a specified model performance metric (e.g. val_loss) and when it stops improving for a specified number of epochs, automatically stops training.
Using the EarlyStopping callback combined with the ModelCheckpoint callback saving the best performing model automatically, we could keep our model training for an unlimited number of epochs until it stops improving.
Let's set both of these up to monitor our model's val_loss.
# Setup EarlyStopping callback to stop training if model's val_loss doesn't improve for 3 epochs
early_stopping = tf.keras.callbacks.EarlyStopping(monitor="val_loss", # watch the val loss metric
                                                  patience=3) # if val loss decreases for 3 epochs in a row, stop training

# Create ModelCheckpoint callback to save best model during fine-tuning
checkpoint_path = "fine_tune_checkpoints/"
model_checkpoint = tf.keras.callbacks.ModelCheckpoint(checkpoint_path,
                                                      save_best_only=True,
                                                      monitor="val_loss")
Woohoo! Fine-tuning callbacks ready.
If you're planning on training large models, the ModelCheckpoint and EarlyStopping are two callbacks you'll want to become very familiar with.
We're almost ready to start fine-tuning our model but there's one more callback we're going to implement: ReduceLROnPlateau.
Remember how the learning rate is the most important model hyperparameter you can tune? (if not, treat this as a reminder).
Well, the ReduceLROnPlateau callback helps to tune the learning rate for you.
Like the ModelCheckpoint and EarlyStopping callbacks, the ReduceLROnPlateau callback montiors a specified metric and when that metric stops improving, it reduces the learning rate by a specified factor (e.g. divides the learning rate by 10).
🤔 Question: Why lower the learning rate?
Imagine having a coin at the back of the couch and you're trying to grab with your fingers.
Now think of the learning rate as the size of the movements your hand makes towards the coin.
The closer you get, the smaller you want your hand movements to be, otherwise the coin will be lost.
Our model's ideal performance is the equivalent of grabbing the coin. So as training goes on and our model gets closer and closer to it's ideal performance (also called convergence), we want the amount it learns to be less and less.
To do this we'll create an instance of the ReduceLROnPlateau callback to monitor the validation loss just like the EarlyStopping callback.
Once the validation loss stops improving for two or more epochs, we'll reduce the learning rate by a factor of 5 (e.g. 0.001 to 0.0002).
And to make sure the learning rate doesn't get too low (and potentially result in our model learning nothing), we'll set the minimum learning rate to 1e-7.
# Creating learning rate reduction callback
reduce_lr = tf.keras.callbacks.ReduceLROnPlateau(monitor="val_loss",
                                                 factor=0.2, # multiply the learning rate by 0.2 (reduce by 5x)
                                                 patience=2,
                                                 verbose=1, # print out when learning rate goes down
                                                 min_lr=1e-7)
Learning rate reduction ready to go!
Now before we start training, we've got to recompile our model.
We'll use sparse categorical crossentropy as the loss and since we're fine-tuning, we'll use a 10x lower learning rate than the Adam optimizers default (1e-4 instead of 1e-3).
# Compile the model
loaded_gs_model.compile(loss="sparse_categorical_crossentropy", # sparse_categorical_crossentropy for labels that are *not* one-hot
                        optimizer=tf.keras.optimizers.Adam(0.0001), # 10x lower learning rate than the default
                        metrics=["accuracy"])
Okay, model compiled.
Now let's fit it on all of the data.
We'll set it up to run for up to 100 epochs.
Since we're going to be using the EarlyStopping callback, it might stop before reaching 100 epochs.
🔑 Note: Running the cell below will set the model up to fine-tune all of the pre-trained weights in the base model on all of the Food101 data. Doing so with unoptimized data pipelines and without mixed precision training will take a fairly long time per epoch depending on what type of GPU you're using (about 15-20 minutes on Colab GPUs). But don't worry, the code we've written above will ensure it runs much faster (more like 4-5 minutes per epoch).
# Start to fine-tune (all layers)
history_101_food_classes_all_data_fine_tune = loaded_gs_model.fit(train_data,
                                                        epochs=100, # fine-tune for a maximum of 100 epochs
                                                        steps_per_epoch=len(train_data),
                                                        validation_data=test_data,
                                                        validation_steps=int(0.15 * len(test_data)), # validation during training on 15% of test data
                                                        callbacks=[create_tensorboard_callback("training_logs", "efficientb0_101_classes_all_data_fine_tuning"), # track the model training logs
                                                                   model_checkpoint, # save only the best model during training
                                                                   early_stopping, # stop model after X epochs of no improvements
                                                                   reduce_lr]) # reduce the learning rate after X epochs of no improvements
Saving TensorBoard log files to: training_logs/efficientb0_101_classes_all_data_fine_tuning/20230519-022854
Epoch 1/100
2368/2368 [==============================] - 246s 81ms/step - loss: 0.9223 - accuracy: 0.7525 - val_loss: 0.7872 - val_accuracy: 0.7749 - lr: 1.0000e-04
Epoch 2/100
2368/2368 [==============================] - 191s 81ms/step - loss: 0.5795 - accuracy: 0.8399 - val_loss: 0.7839 - val_accuracy: 0.7831 - lr: 1.0000e-04
Epoch 3/100
2368/2368 [==============================] - 162s 68ms/step - loss: 0.3299 - accuracy: 0.9063 - val_loss: 0.8827 - val_accuracy: 0.7765 - lr: 1.0000e-04
Epoch 4/100
2368/2368 [==============================] - ETA: 0s - loss: 0.1722 - accuracy: 0.9486
Epoch 4: ReduceLROnPlateau reducing learning rate to 1.9999999494757503e-05.
2368/2368 [==============================] - 162s 68ms/step - loss: 0.1722 - accuracy: 0.9486 - val_loss: 0.9571 - val_accuracy: 0.7850 - lr: 1.0000e-04
Epoch 5/100
2368/2368 [==============================] - 162s 68ms/step - loss: 0.0359 - accuracy: 0.9920 - val_loss: 1.0549 - val_accuracy: 0.8032 - lr: 2.0000e-05
🔑 Note: If you didn't use mixed precision or use techniques such as
prefetch()in the Batch & prepare datasets section, your model fine-tuning probably takes up to 2.5-3x longer per epoch (see the output below for an example).
| Prefetch and mixed precision | No prefetch and no mixed precision | |
|---|---|---|
| Time per epoch | ~280-300s | ~1127-1397s |
Results from fine-tuning 🍔👁 Food Vision Big™ on Food101 dataset using an EfficienetNetB0 backbone using a Google Colab Tesla T4 GPU.
Saving TensorBoard log files to: training_logs/efficientB0_101_classes_all_data_fine_tuning/20200928-013008
Epoch 1/100
2368/2368 [==============================] - 1397s 590ms/step - loss: 1.2068 - accuracy: 0.6820 - val_loss: 1.1623 - val_accuracy: 0.6894
Epoch 2/100
2368/2368 [==============================] - 1193s 504ms/step - loss: 0.9459 - accuracy: 0.7444 - val_loss: 1.1549 - val_accuracy: 0.6872
Epoch 3/100
2368/2368 [==============================] - 1143s 482ms/step - loss: 0.7848 - accuracy: 0.7838 - val_loss: 1.0402 - val_accuracy: 0.7142
Epoch 4/100
2368/2368 [==============================] - 1127s 476ms/step - loss: 0.6599 - accuracy: 0.8149 - val_loss: 0.9599 - val_accuracy: 0.7373
Example fine-tuning time for non-prefetched data as well as non-mixed precision training (~2.5-3x longer per epoch).
Let's make sure we save our model before we start evaluating it.
From the above, does it look like our model is overfitting or underfitting?
Remember, if the training loss is significantly lower than the validation loss, it's a hint that the model has overfit the training data and not learned generalizable patterns to unseen data.
But it does look like our model has gained a few performance points from fine-tuning, let's evaluate on the whole test dataset and see if managed to beat the DeepFood paper's result of 77.4% accuracy.
# # Save model to Google Drive (optional)
# loaded_gs_model.save("/content/drive/MyDrive/tensorflow_course/food_vision/07_efficientnetb0_fine_tuned_101_classes_mixed_precision/")
# Save model locally (note: if you're using Google Colab and you save your model locally, it will be deleted when your Google Colab session ends)
loaded_gs_model.save("07_efficientnetb0_fine_tuned_101_classes_mixed_precision")
Download fine-tuned model from Google Storage
As mentioned before, training models can take a significant amount of time.
And again, like any good cooking show, here's something we prepared earlier...
It's a fine-tuned model exactly like the one we trained above but it's saved to Google Storage so it can be accessed, imported and evaluated.
# Download and evaluate fine-tuned model from Google Storage
!wget https://storage.googleapis.com/ztm_tf_course/food_vision/07_efficientnetb0_fine_tuned_101_classes_mixed_precision.zip
--2023-05-19 02:44:48--  https://storage.googleapis.com/ztm_tf_course/food_vision/07_efficientnetb0_fine_tuned_101_classes_mixed_precision.zip
Resolving storage.googleapis.com (storage.googleapis.com)... 142.250.4.128, 142.251.10.128, 142.251.12.128, ...
Connecting to storage.googleapis.com (storage.googleapis.com)|142.250.4.128|:443... connected.
HTTP request sent, awaiting response... 200 OK
Length: 46790356 (45M) [application/zip]
Saving to: ‘07_efficientnetb0_fine_tuned_101_classes_mixed_precision.zip’

07_efficientnetb0_f 100%[===================>]  44.62M  14.1MB/s    in 3.2s

2023-05-19 02:44:51 (14.1 MB/s) - ‘07_efficientnetb0_fine_tuned_101_classes_mixed_precision.zip’ saved [46790356/46790356]
The downloaded model comes in zip format (.zip) so we'll unzip it into the Google Colab instance.
# Unzip fine-tuned model
!mkdir downloaded_fine_tuned_gs_model # create separate directory for fine-tuned model downloaded from Google Storage
!unzip 07_efficientnetb0_fine_tuned_101_classes_mixed_precision -d downloaded_fine_tuned_gs_model
Archive:  07_efficientnetb0_fine_tuned_101_classes_mixed_precision.zip
   creating: downloaded_fine_tuned_gs_model/07_efficientnetb0_fine_tuned_101_classes_mixed_precision/
   creating: downloaded_fine_tuned_gs_model/07_efficientnetb0_fine_tuned_101_classes_mixed_precision/variables/
  inflating: downloaded_fine_tuned_gs_model/07_efficientnetb0_fine_tuned_101_classes_mixed_precision/variables/variables.data-00000-of-00001
  inflating: downloaded_fine_tuned_gs_model/07_efficientnetb0_fine_tuned_101_classes_mixed_precision/variables/variables.index
  inflating: downloaded_fine_tuned_gs_model/07_efficientnetb0_fine_tuned_101_classes_mixed_precision/saved_model.pb
   creating: downloaded_fine_tuned_gs_model/07_efficientnetb0_fine_tuned_101_classes_mixed_precision/assets/
Now we can load it using the tf.keras.models.load_model() method and get a summary (it should be the exact same as the model we created above).
# Load in fine-tuned model from Google Storage and evaluate
loaded_fine_tuned_gs_model = tf.keras.models.load_model("downloaded_fine_tuned_gs_model/07_efficientnetb0_fine_tuned_101_classes_mixed_precision")
# Get a model summary (same model architecture as above)
loaded_fine_tuned_gs_model.summary()
Model: "model"
_________________________________________________________________
 Layer (type)                Output Shape              Param #
=================================================================
 input_layer (InputLayer)    [(None, 224, 224, 3)]     0

 efficientnetb0 (Functional  (None, None, None, 1280   4049571
 )                           )

 pooling_layer (GlobalAvera  (None, 1280)              0
 gePooling2D)

 dense (Dense)               (None, 101)               129381

 softmax_float32 (Activatio  (None, 101)               0
 n)

=================================================================
Total params: 4178952 (15.94 MB)
Trainable params: 4136929 (15.78 MB)
Non-trainable params: 42023 (164.16 KB)
_________________________________________________________________
Finally, we can evaluate our model on the test data (this requires the test_data variable to be loaded.
# Note: Even if you're loading in the model from Google Storage, you will still need to load the test_data variable for this cell to work
results_downloaded_fine_tuned_gs_model = loaded_fine_tuned_gs_model.evaluate(test_data)
results_downloaded_fine_tuned_gs_model
790/790 [==============================] - 15s 16ms/step - loss: 0.9072 - accuracy: 0.8017
[0.9072489738464355, 0.801663339138031]
Excellent! Our saved model is performing as expected (better results than the DeepFood paper!).
Congrautlations! You should be excited! You just trained a computer vision model with competitive performance to a research paper and in far less time (our model took ~20 minutes to train versus DeepFood's quoted 2-3 days).
In other words, you brought Food Vision life!
If you really wanted to step things up, you could try using the EfficientNetB4 model (a larger version of EfficientNetB0). At at the time of writing, the EfficientNet family has the state of the art classification results on the Food101 dataset.
📖 Resource: To see which models are currently performing the best on a given dataset or problem type as well as the latest trending machine learning research, be sure to check out paperswithcode.com and sotabench.com.
View training results on TensorBoard
Since we tracked our model's fine-tuning training logs using the TensorBoard callback, let's upload them and inspect them on TensorBoard.dev.
# Upload experiment results to TensorBoard (uncomment to run)
# !tensorboard dev upload --logdir ./training_logs \
#   --name "Fine-tuning EfficientNetB0 on all Food101 Data" \
#   --description "Training results for fine-tuning EfficientNetB0 on Food101 Data with learning rate 0.0001" \
#   --one_shot
Viewing at our model's training curves on TensorBoard.dev, it looks like our fine-tuning model gains boost in performance but starts to overfit as training goes on.
See the training curves on TensorBoard.dev here: https://tensorboard.dev/experiment/2KINdYxgSgW2bUg7dIvevw/
To fix this, in future experiments, we might try things like:
- A different iteration of
EfficientNet(e.g.EfficientNetB4instead ofEfficientNetB0). - Unfreezing less layers of the base model and training them rather than unfreezing the whole base model in one go.
# View past TensorBoard experiments
# !tensorboard dev list
# Delete past TensorBoard experiments
# !tensorboard dev delete --experiment_id YOUR_EXPERIMENT_ID

# Example
# !tensorboard dev delete --experiment_id OAE6KXizQZKQxDiqI3cnUQ
🛠 Exercises
- Use the same evaluation techniques on the large-scale Food Vision model as you did in the previous notebook (Transfer Learning Part 3: Scaling up). More specifically, it would be good to see:
- A confusion matrix between all of the model's predictions and true labels.
- A graph showing the f1-scores of each class.
- A visualization of the model making predictions on various images and comparing the predictions to the ground truth.
- For example, plot a sample image from the test dataset and have the title of the plot show the prediction, the prediction probability and the ground truth label.
- Take 3 of your own photos of food and use the Food Vision model to make predictions on them. How does it go? Share your images/predictions with the other students.
- Retrain the model (feature extraction and fine-tuning) we trained in this notebook, except this time use
EfficientNetB4as the base model instead ofEfficientNetB0. Do you notice an improvement in performance? Does it take longer to train? Are there any tradeoffs to consider? - Name one important benefit of mixed precision training, how does this benefit take place?
📖 Extra-curriculum
- Read up on learning rate scheduling and the learning rate scheduler callback. What is it? And how might it be helpful to this project?
- Read up on TensorFlow data loaders (improving TensorFlow data loading performance). Is there anything we've missed? What methods you keep in mind whenever loading data in TensorFlow? Hint: check the summary at the bottom of the page for a gret round up of ideas.
- Read up on the documentation for TensorFlow mixed precision training. What are the important things to keep in mind when using mixed precision training?